Experts Teach You How to Do It: A One-Day Tokyo (Shinjuku) Round-Trip Shopping Spree from Taiwan

▲ Expert-Sharing: One-Day Shopping Itinerary in Shinjuku, Japan (Image / Screenshot fromPTT Japan Travel Forum)
Reported by Yan Xintong / Taipei
Many people in Taiwan enjoy traveling to Japan for shopping. Recently, a netizen shared their experience of a one-day shopping trip to Shinjuku, Japan, on the PTT Japan Travel Forum. Their meticulous planning made this one-day shopping trip surprisingly smooth and enjoyable.
The netizen, with the ID hsinyeh, is a male living in Taipei who works in the IT industry. In an interview, he mentioned that he first visited Japan about two years ago and has been there two to three times in total, usually taking advantage of LCC (low-cost carrier) deals or visiting during special seasons like cherry blossom or autumn foliage seasons. Normally, he plans his trips by searching online, checking the PTT Japan Travel Forum, and reading articles shared by others.
His advice for those who haven’t been to Japan yet is “Don’t be afraid—after going once or twice, you’ll get the hang of it.”
Hsinyeh explained that he chose the Shinjuku branch for this shopping trip mainly because among Bic Camera stores in Tokyo, the largest ones are typically located in Shinjuku, Ikebukuro, and Yurakucho. As for Yodobashi Camera, the bigger branches are usually in Shinjuku, Akihabara, and Ueno. But if you want to visit both Bic Camera and Yodobashi, Shinjuku is the best common location.
Additionally, Shinjuku has the JR Narita Express (N'EX) direct service, so choosing the Shinjuku branch is ideal. Of course, other branches are fine too—if you’ve already reserved a store pickup, you might just focus on the Yodobashi Ueno branch, which is right across from Keisei Ueno Station and can be accessed conveniently via Keisei Electric Railway, with much lower fares than JR.
Hsinyeh also mentioned that if you want to go to a Bic Camera Outlet, you can choose Yurakucho, which is very close to Tokyo Station. You could consider taking a taxi to Tokyo Station and then transferring to the NEX (though the downside is that Tokyo Station is huge, and transfers involve a lot of walking), or take the JR Yamanote Line to Nippori and transfer to the Keisei Electric Railway. The station there is smaller and more convenient for transfers, but watch out for ongoing construction, and the Yamanote Line can be very crowded. Also, prices vary between different BIC CAMERA and YODOBASHI branches, so if you’re worried about paying too much, it’s good to compare.
But Hsinyeh advised that in Japan, pretty much anything you buy will be cheaper than in Taiwan, so it’s best to prioritize convenience. Since you won’t find the absolute cheapest price anyway—on Kakaku (a Japanese price comparison site), you can always find even lower prices—it’s okay to save a bit; don’t exhaust yourself trying to save an extra 2%. Although there are price differences, competition within Tokyo is high, so the gaps aren’t huge. Hsinyeh emphasized that after doing some light price comparisons, he just bought what was available.
Other Notes
Elevator Locations. Although Tokyo is more accessible than Taipei, due to the age of its subway infrastructure, not every exit has elevators or escalators. Also, be mindful of customs regulations and factor in any additional tax costs to see if it’s worth it.
Below is the original post by netizen hsinyeh on the PTT Japan Travel Forum:
Went shopping in Shinjuku yesterday and would like to share some simple insights and itinerary tips
1. Departure from Taipei to Narita, Japan
For the outbound flight, take the last Uni Air flight from Taipei Main Station at 00:20, arriving at the airport around 01:10
First go to the North Meeting Point to pick up the Fujicolor cards gifted by Riccio at the airport two days prior, then return to Counter 1 to check in
The Vanilla red-eye flight’s departure time was changed from 03:00 to 03:30 due to runway maintenance at Taoyuan Airport
When I arrived at the counter around 01:20, Vanilla was already open, with about twenty people ahead of me in line to check in
EVA Air ground staff worked quickly and opened four counters, processing check-ins in about ten minutes
Since I had very little luggage—just a carry-on bag and an empty suitcase—the ground staff asked to check the weight of the suitcase
Because the red-eye flight was exhausting, I paid extra for a first-row seat to sleep more comfortably (NT$300, which is a great deal)
2. Arrival Time and Customs Clearance (No Checked Baggage)
Slept all the way until around 06:50 (Japan time). The captain announced a 20-minute delay, with arrival at 07:20
Although it was delayed, it actually arrived earlier—according to the revised time, we were supposed to land at 07:30
After disembarking, I took the shuttle bus and walked quickly, arriving at the JR ticket counter in the basement by 07:37
The JR Service Center hadn’t started operating yet, so I had to buy my ticket at the counter next to the gate entrance
*There will be a crowd queuing by the counter—that’s for people exchanging their JR Passes. If you just want to buy tickets, go to the right side where there’s no line at the counter.
I only wanted to purchase the round-trip NEX discount ticket, so I got my train tickets smoothly. I’m on the 8:09 train to Shinjuku, arriving at 9:55.
3. Shopping Itinerary
a.Microwave Steam Oven
After arriving in Shinjuku, I first had a meal at Ichiran to fill up, then headed straight to the nearby Bic Camera to inquire about the product.
The microwave steam oven I wanted—the Hitachi MRO-NBK5000-W—had just one unit left. Without wasting any time, I placed the order immediately.
When the staff asked if I wanted it delivered or to take it away, I said I’d take it. The look on his face was priceless…
I told the staff I’d come back in the afternoon to pick it up. After checkout, he gave me a small blue slip—I needed that to collect my item.
b.Amplifier
High-ticket items like this usually aren’t well-stocked in-store. I originally wanted to buy it along with the microwave steam oven.
But both of the models I was eyeing were out of stock across all Bic Camera locations in the Greater Tokyo Area. I checked Yodobashi and found some available at the west exit.
So I decided to head to Yodobashi instead.
First, I went to the Yodobashi near the east exit and asked about stock... answer: none. I checked other stores and learned the west exit had some.
But when I asked if they could transfer one over or place an order for me, they refused both.
So I had to cross the railway tracks and walk to the west exit. After picking one after some deliberation, I checked out. I could ask the staff to wrap it in bubble wrap.
P.S. The staff asked if I wanted delivery. I said I’d take it with me, and he looked surprised and asked if I was sure since it was heavy. I nodded firmly...
After checkout, I asked the staff to package it for me and come back in an hour to pick it up.
c.Rice Cooker
After picking that out, I went next door to look at rice cookers. Rice cookers are dirt cheap in Japan—you can get them anywhere. I picked a Toshiba model with IH.
It's a 5.5-cup capacity, and I paid around 9,000 yen after tax. I also got it tax-refunded and had them package it.
d.Mosquito RepellerOriginally, I was looking at the 150-day version that people recommended, but I didn’t see it at any Matsumoto Kiyoshi or other drugstores.
Finally, I found the 200-day version at the Bic Camera near the west exit (Odakyu Department Store), and there were plenty in stock.
But they didn’t sell refill cartridges.
e. Shopping Cart
I had originally wanted to buya platform cart
but neither Bic Camera nor Yodobashi had any in stock, so I had to go to the Yodobashi near the west exit.
For two-wheeled hand trucks, the maximum weight limit is 50 kilograms. This one costs less than 10,000 yen, but since I bought other items as well,
the total amount reached the tax refund threshold, so this one is also eligible for a refund (processed separately).
Hand trucks with two wheels can be prone to instability, so it’s recommended that those who want to buy one pre-order a platform truck on the website in advance.
Picking up at the store should allow for a combined tax refund.
4. Return Transportation
The return flight is with Vanilla Air at 21:20. To play it safe, I decided to arrive at the airport three hours early.
And since I purchased a round-trip NEX ticket, the return was naturally on the NEX—no need to think about it. I took the 17:09 train and arrived at the airport at 18:28.
But I considered various transportation options for a while—Tokyo Shuttle by Keisei, Limousine Bus, and Keisei Electric Railway.
In the end, I chose the NEX for two reasons.
a. Both the east and west exits of Shinjuku Station have Yodobashi Camera and Bic Camera, with many stores and a better chance of finding what I needed.
b. There didn’t seem to be any luggage restrictions.
However, Shinjuku Station also has its downsides, such as its large size and the long distance from the entrance to the platforms.
The fare is slightly higher.
So if you’re not carrying as much as I was, or if your items are easy to find and you’ve already booked them online, there are other options.
Assuming everything is available at Yodobashi, I might have chosen the one in Ueno, right across from Keisei Ueno Station.
Or if staying within Bic Camera and not exceeding the weight limit, I might have gone to Yurakucho Bic (which also has an outlet) and taken a taxi.
To get to Tokyo Station’s Yaesu Exit to take the bus (900 yen), or transfer to Keisei at Nippori.
*Buses have a limit of one piece of luggage per person / 20 kg.
If you’re like me and choose to take the NEX from Shinjuku, it’s recommended to go to the east exit if possible.
And the Yodobashi at the east exit is a bit closer to Bic Camera.
At the east exit, just following the JR signs won’t lead you to elevators or escalators. It’s recommended to take the elevator to B1 from Lumine Est.This gate.
Once you exit B1, you’ll see the JR ticket gates. The right-side entrance uses a wider gate for people with disabilities, which is an IC-only gate.
But the very left side (where many people exit) has a gate similar to Taipei’s MRT, which works both ways.
That one accepts magnetic strip tickets. Go to Platform 5 to wait for the train. The distance is manageable—about 150–200 meters after entering the station.
But there’s only an escalator and no elevator for part of the way up to the platform... If you absolutely need an elevator, take the new south exit instead.
5. NEX to the Airport
I’ve actually taken the NEX several times before. Basically, there’s never a shortage of storage space (even after I stuffed it with a bunch of stuff).
So just place your things securely and start getting ready about ten minutes before arrival.
Since it’s a bit tricky to get on and off with luggage by yourself, I always head to the luggage racks early to prepare.
NEX itself also announces that the doors to the airport can get crowded, so you should prepare your luggage in advance.
But the reason for arriving ten minutes early is that the characteristic of the NEX is that it arrives at Airport Terminal 2 in the last five minutes or so.
The last section of the track may be relatively straight, so the speed is much faster than usual, and it shakes abnormally.
For example, trying to load my microwave oven onto the trolley and tie it down was unusually difficult, so I recommend preparing even earlier.
Also, I brought a bento from Mos Burger to eat on the train for dinner.
That’s about all the stuff @ Shinjuku Station, NEX Platform 5
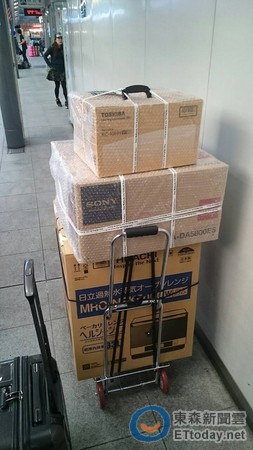
▲ Travel experts teach you how to save big on a one-day trip in Japan (Photo provided by hsinyeh)
6. Final check-in
Forgot to mention one thing—although there are airport trolleys available right after exiting JR,
if you’re taking Vanilla like I did, trolleys are not allowed past the check-in counter...
So if you can choose, I wouldn’t unload everything, because you’ll have to carry it again just a short distance before loading it onto a small trolley...
(Though Vanilla will move to Terminal 3 by LCC4/8, which should be better.)
With so much stuff, it definitely exceeded the weight limit, but Vanilla’s excess baggage fee is very cheap—500 Yen per 5kg (though it might go up tomorrow).
Plus a 1000 Yen handling fee.
In the end, the microwave oven weighed 32 kg + the amplifier 22 kg + the rice cooker 3 kg + the carry-on suitcase with cosmetics and a body fat scale totaling 9 kg.
The trolley weighed 2 kg, making the total checked baggage 68 kg, with an excess fee of 3000 + 1000 = 4000 Yen.
A special note is that no single piece of luggage can exceed 32 kg—you must keep it under 32 kg.
This model with the box weighs 34 kg, so you have to take out the inner metal tray to bring it down to 32 kg.
If you want to buy one, you can look up others’ experiences by searching the model number to see how heavy it is and decide whether to unpack it beforehand.
That’s roughly the itinerary for a one-day shopping trip in Shinjuku, provided for friends who want to buy large appliances in Tokyo.
--
If you ask me how to get everything home from the airport, I’ll remind you that airport delivery services only operate until 23:30.
Flights around this time don’t have access to delivery services, so how to get home? Well, at home you rely on your parents, and when you’re out, you rely on friends.
Call a friend to help, or book an airport transfer—either way, it’s not too expensive with a credit card.
(The above content is also published on)PTT Japan Travel BoardThis article is published with the authorization of the original author.
Share
This article is published by HowToTrip. Sharing and reposting are welcome — please credit the source.
Article URL: https://www.howtotrip.net/views-12467
Related Articles
- Shaoxing's "Grandpa Gourd" hangs the gourds back up: "If there are too many people, we'll interact less — just take a quick look from afar"
- Chinese authorities announce "reciprocal adjustment" to Japan visa fees — single-entry visa jumps from 2,250 to 16,750 yen!
- The "health stones" carried by a traveler were found to have radiation levels exceeding safety limits by a thousand times, potentially endangering fellow passengers on the same flight. Customs issues warning!
- Shenzhen Airport Issues Late-Night Notice: Unidentified Aerial Object Detected, Causing Widespread Flight Delays!
- “They only said it cost money after I opened the box and washed it!” 200g of grapes sold for 60 yuan on a high-speed train—12306 responds!
- Can't buy an airline ticket? Denied exit? Blocked from boarding? A large number of Chinese tourists have mysteriously become "discredited individuals"
- Adverse weather and economic fluctuations impact Colombia's coffee market
- Beach bathing area responds to 2 yuan/30 seconds fee for freshwater foot rinsing: Clearly priced!
- Taking off with an improperly closed cabin door? Wing malfunction? Multiple flights made emergency returns mid-journey!
- Experience the gifts of nature! A countdown of the world’s ten most stunning coastlines